Building AWS EC2 Manager with Lambda and Slack
Managing in AWS Console is good but opening a laptop to stop an EC2 Instance can be annoying

Hi there 👋
I'm an Indonesian who loves coffee and dogs!! Also, code sometimes.
Currently studying at Kyoto College of Graduate Studies for Informatics. 🏫
Work as Full-Stack Engineer
If you, like me, have a low spec laptop but want to build a heavy application, you should rent a cloud server and do cloud development. In my case, I started EC2 Instance and did my work there. I start my EC2 Instance at the beginning of the day and stop after I am done with my job, or so I thought. I ended up sleeping without stopping my instance, and at the end of a month, my bill was going up high. After that and a lot of thinking, I begin to develop a solution for this problem. That by creating a way for me to stop or start the instance with less effort.
Control EC2 Instance with Slack Chat with Lambda
We will start with building a slack bot for controlling our EC2 Instance. For this, we need two lambda functions and an API Gateway. The first function we will name itec2-slack-handler function. It will forward requests from API Gateway that came from the slack bot into our second function, ec2-manager. ec2-manager will stop and start function for us.
Build Slack Handler
You might be thinking, why do we need a separate lambda function for handling slack event subscription, which will send a request to API Gateway when there are chats in slack and lambda function for a start or stopping EC2 Instance. I tried to do it in one function. After I finished implementing it, I was encountered a strange bug. When I trigger EC2 Instance one time, I get up to four triggers in my lambda. After many hours of research, I found out that you must return a response to slack. So, to avoid this bug, we need to make two lambda functions.
Your app should respond to the event request with an HTTP 2xx within three seconds. > If it does not, we'll consider the event delivery attempt failed. After a failure, we'll retry > three times, backing off exponentially.
Maintain a response success rate of at least 5% of events per 60 minutes to prevent automatic disabling.
Respond to events with a HTTP 200 OK as soon as you can. Avoid actually processing > and reacting to events within the same process. Implement a queue to handle inbound events after they are received.
https://api.slack.com/apis/connections/events-api
Slack Handler Function
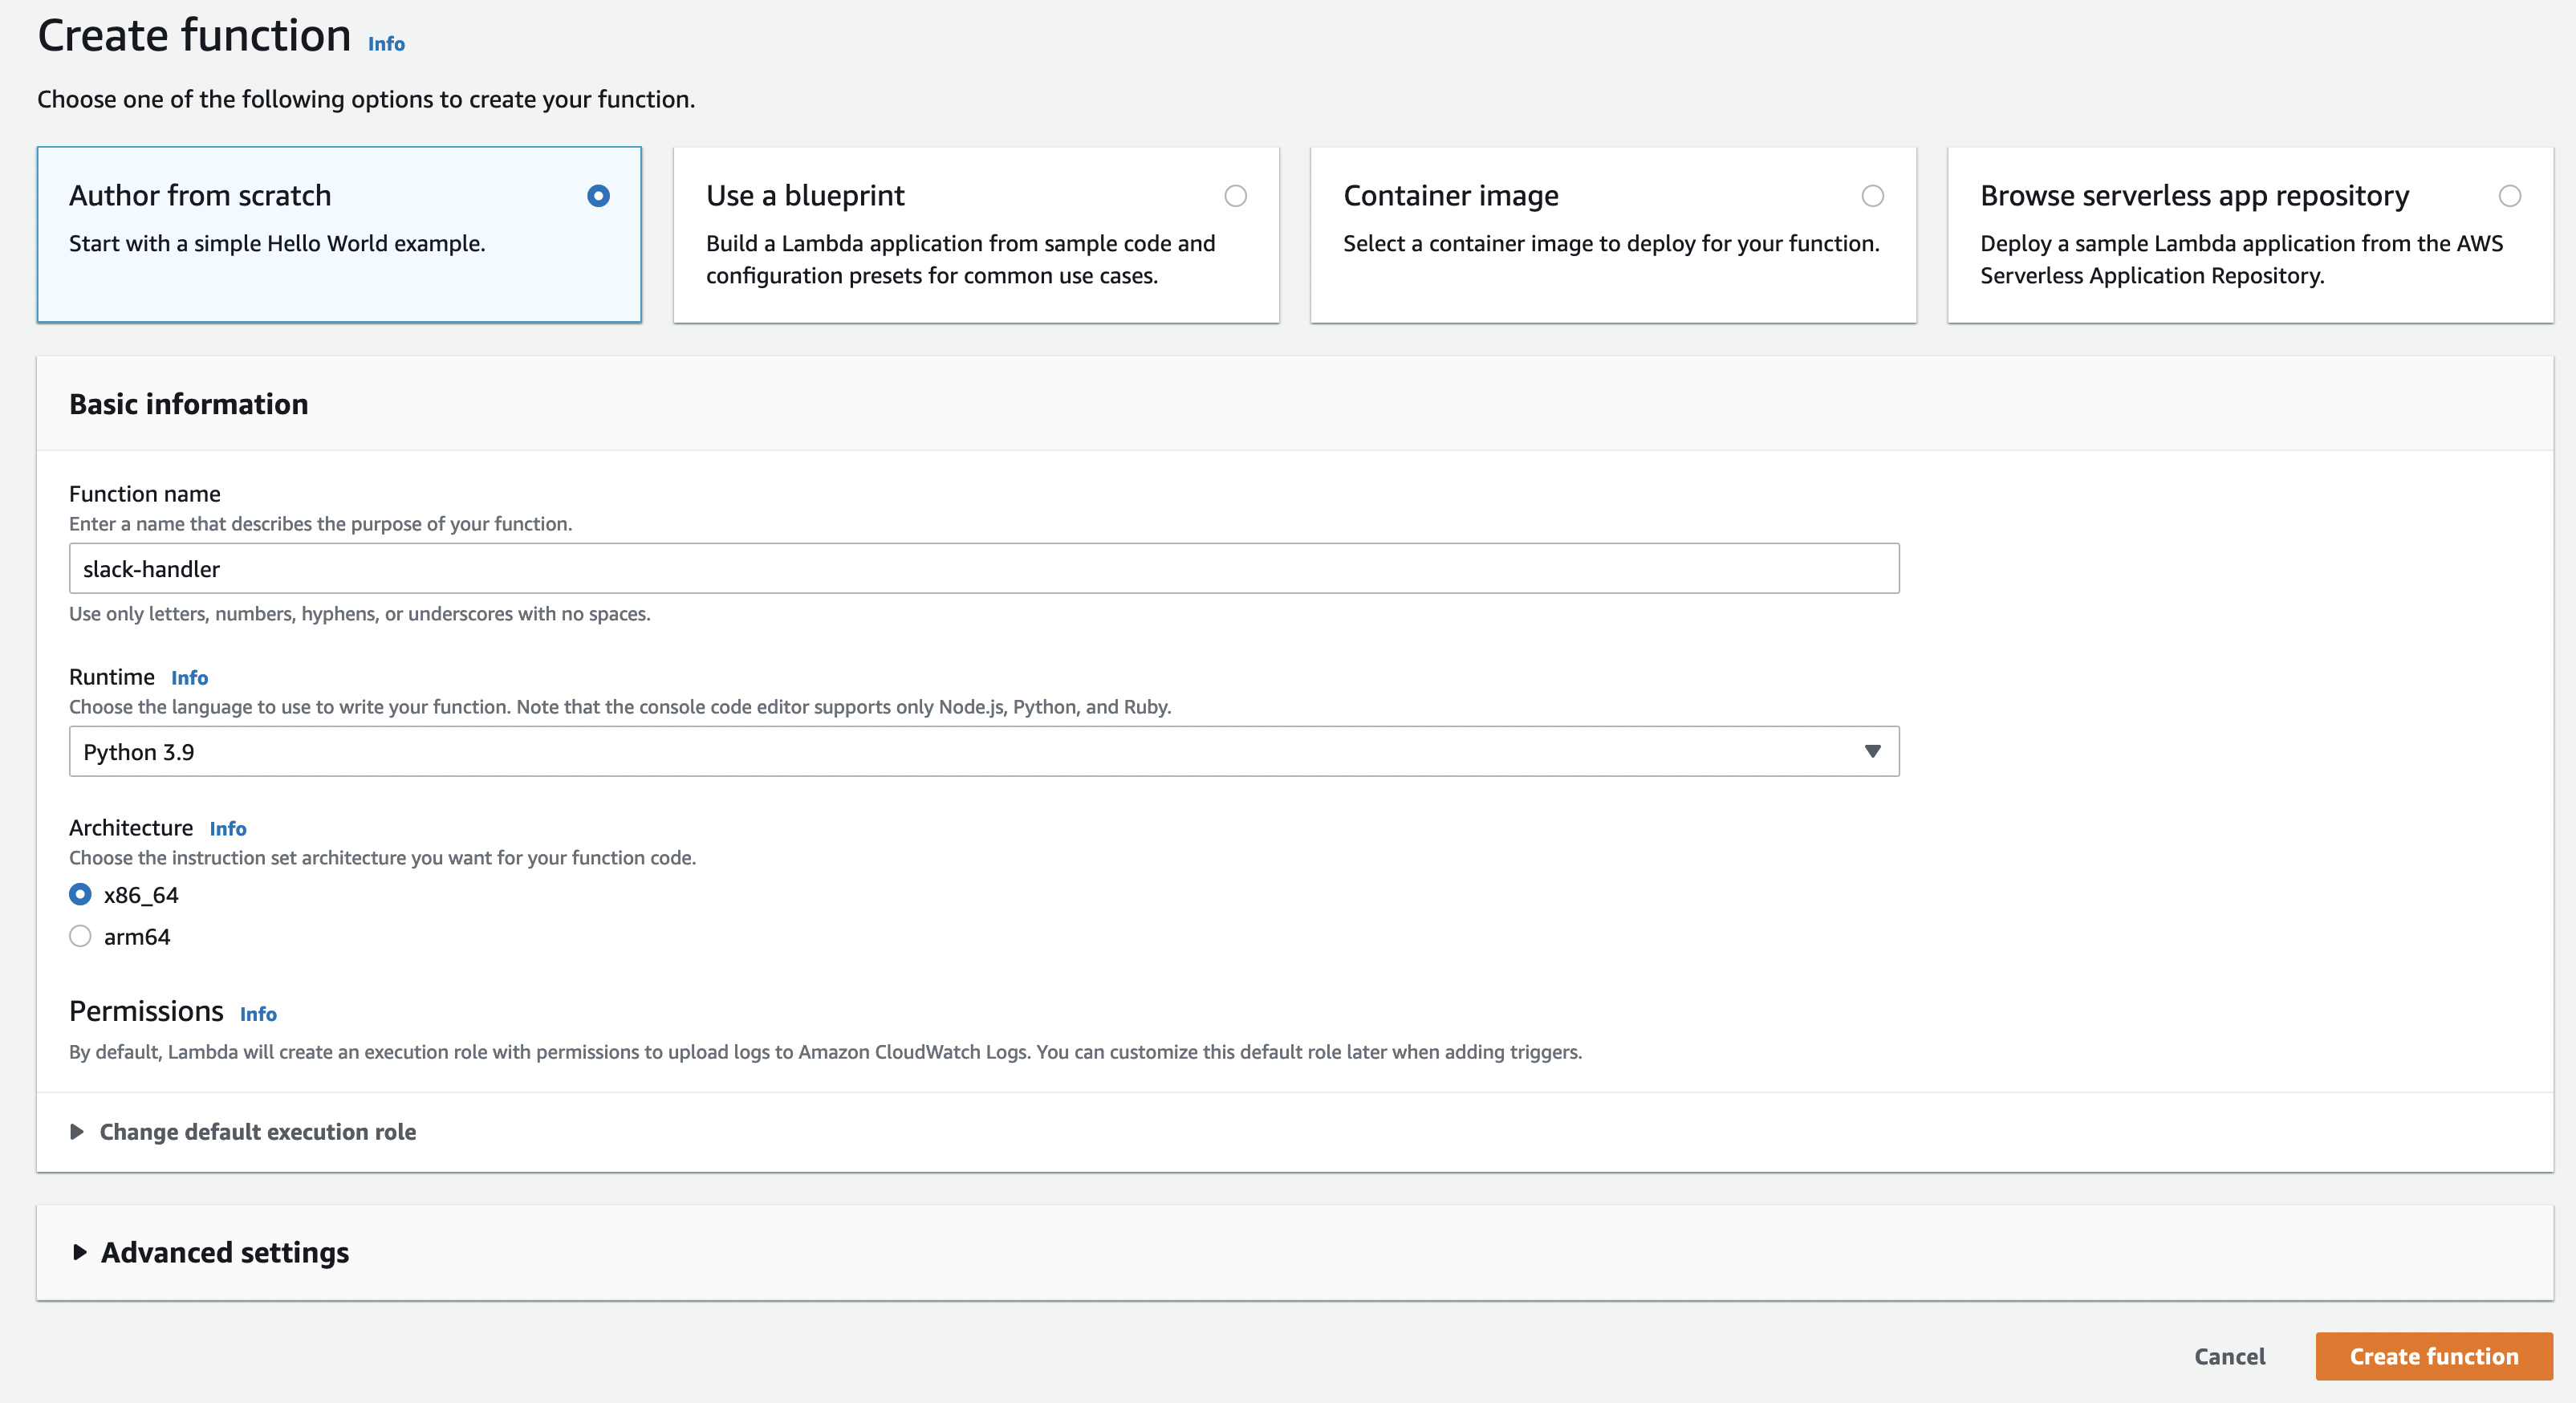
This time we will be using python in lambda. Here is step by step on setting up the EC2 Instance bot in your slack.
Create Lambda function with python 3.9 runtime.
First of all, we will create a lambda that forwards slack bot requests to the slack manager and return 200 responses as soon as they come.
Before writing our "forward request" code, we need to finish the challenge that slack gives up when subscribing to the event.
import json
import boto3

lambda_client = boto3.client('lambda')

def lambda_handler(event, context):
    print(f"Received event:\n{event}\nWith context:\n{context}")

    slack_body = event.get("body")
    slack_event = json.loads(slack_body)
    challenge_answer = slack_event.get("challenge")

    return {
        'statusCode': 200,
        'body': challenge_answer
    }
Lambda alone cannot connect to slack. We need our entry point, and it is API Gateway. AWS makes it easy for us to do that.
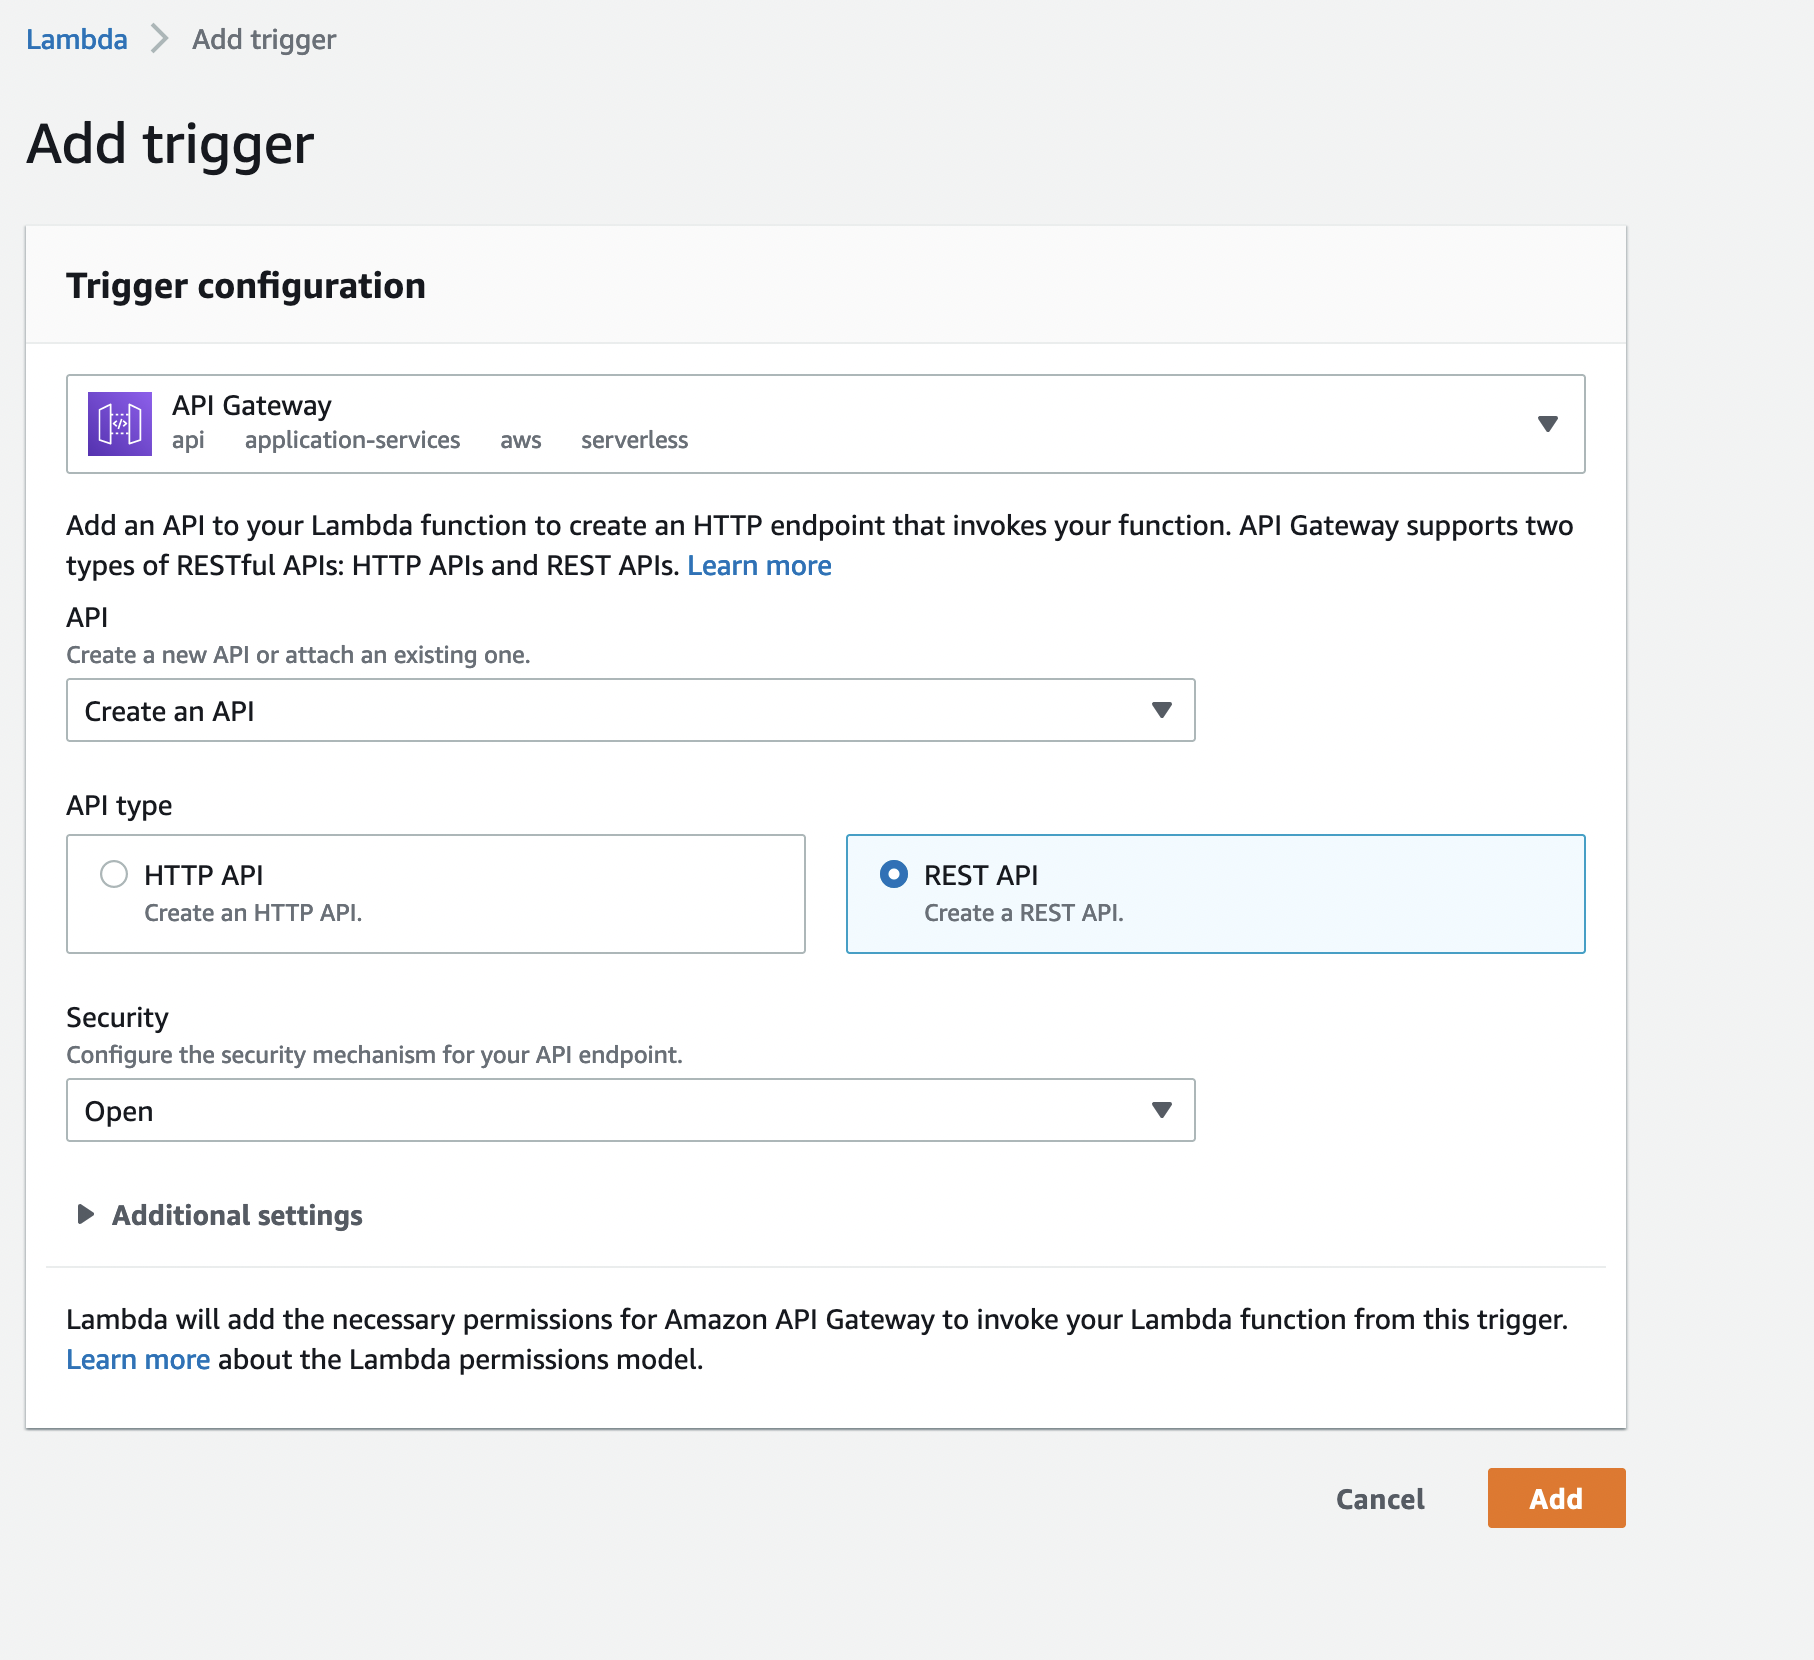
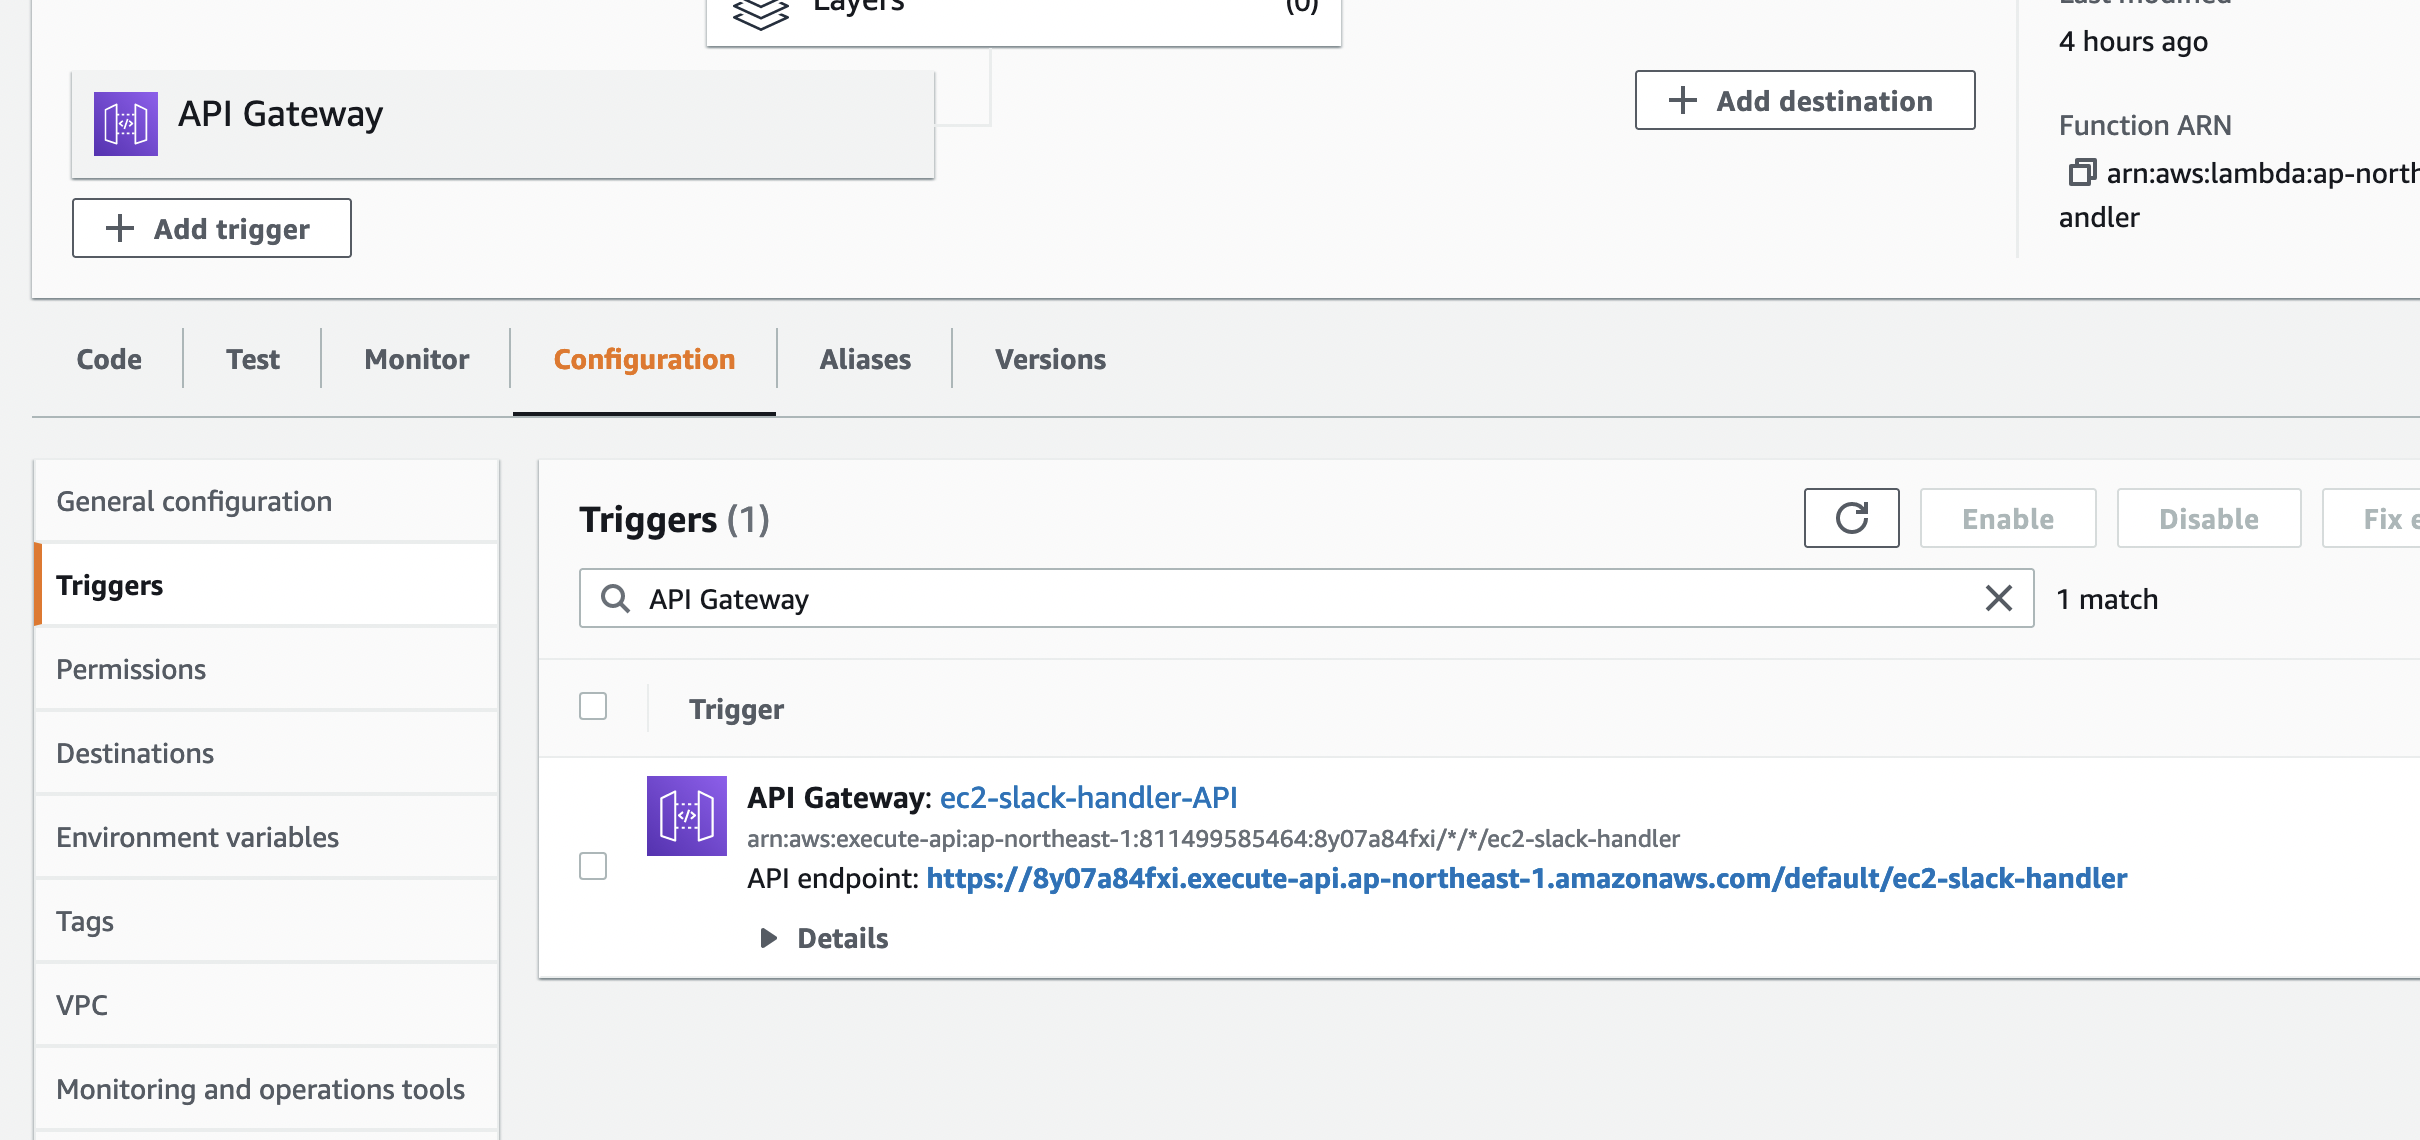
We are done with setting up our environment in AWS for now. Please take note of our API Gateway Endpoint.
Next step, lets set up our slack apps.
Setting up Slack Apps
We want to make a bot that sends our chat in a certain channel to be sent to API Gateway. Here is how we make Slack Bot:
- Go to https://api.slack.com/ and click on the
Your AppsButton - Login and create a new app in your workspace
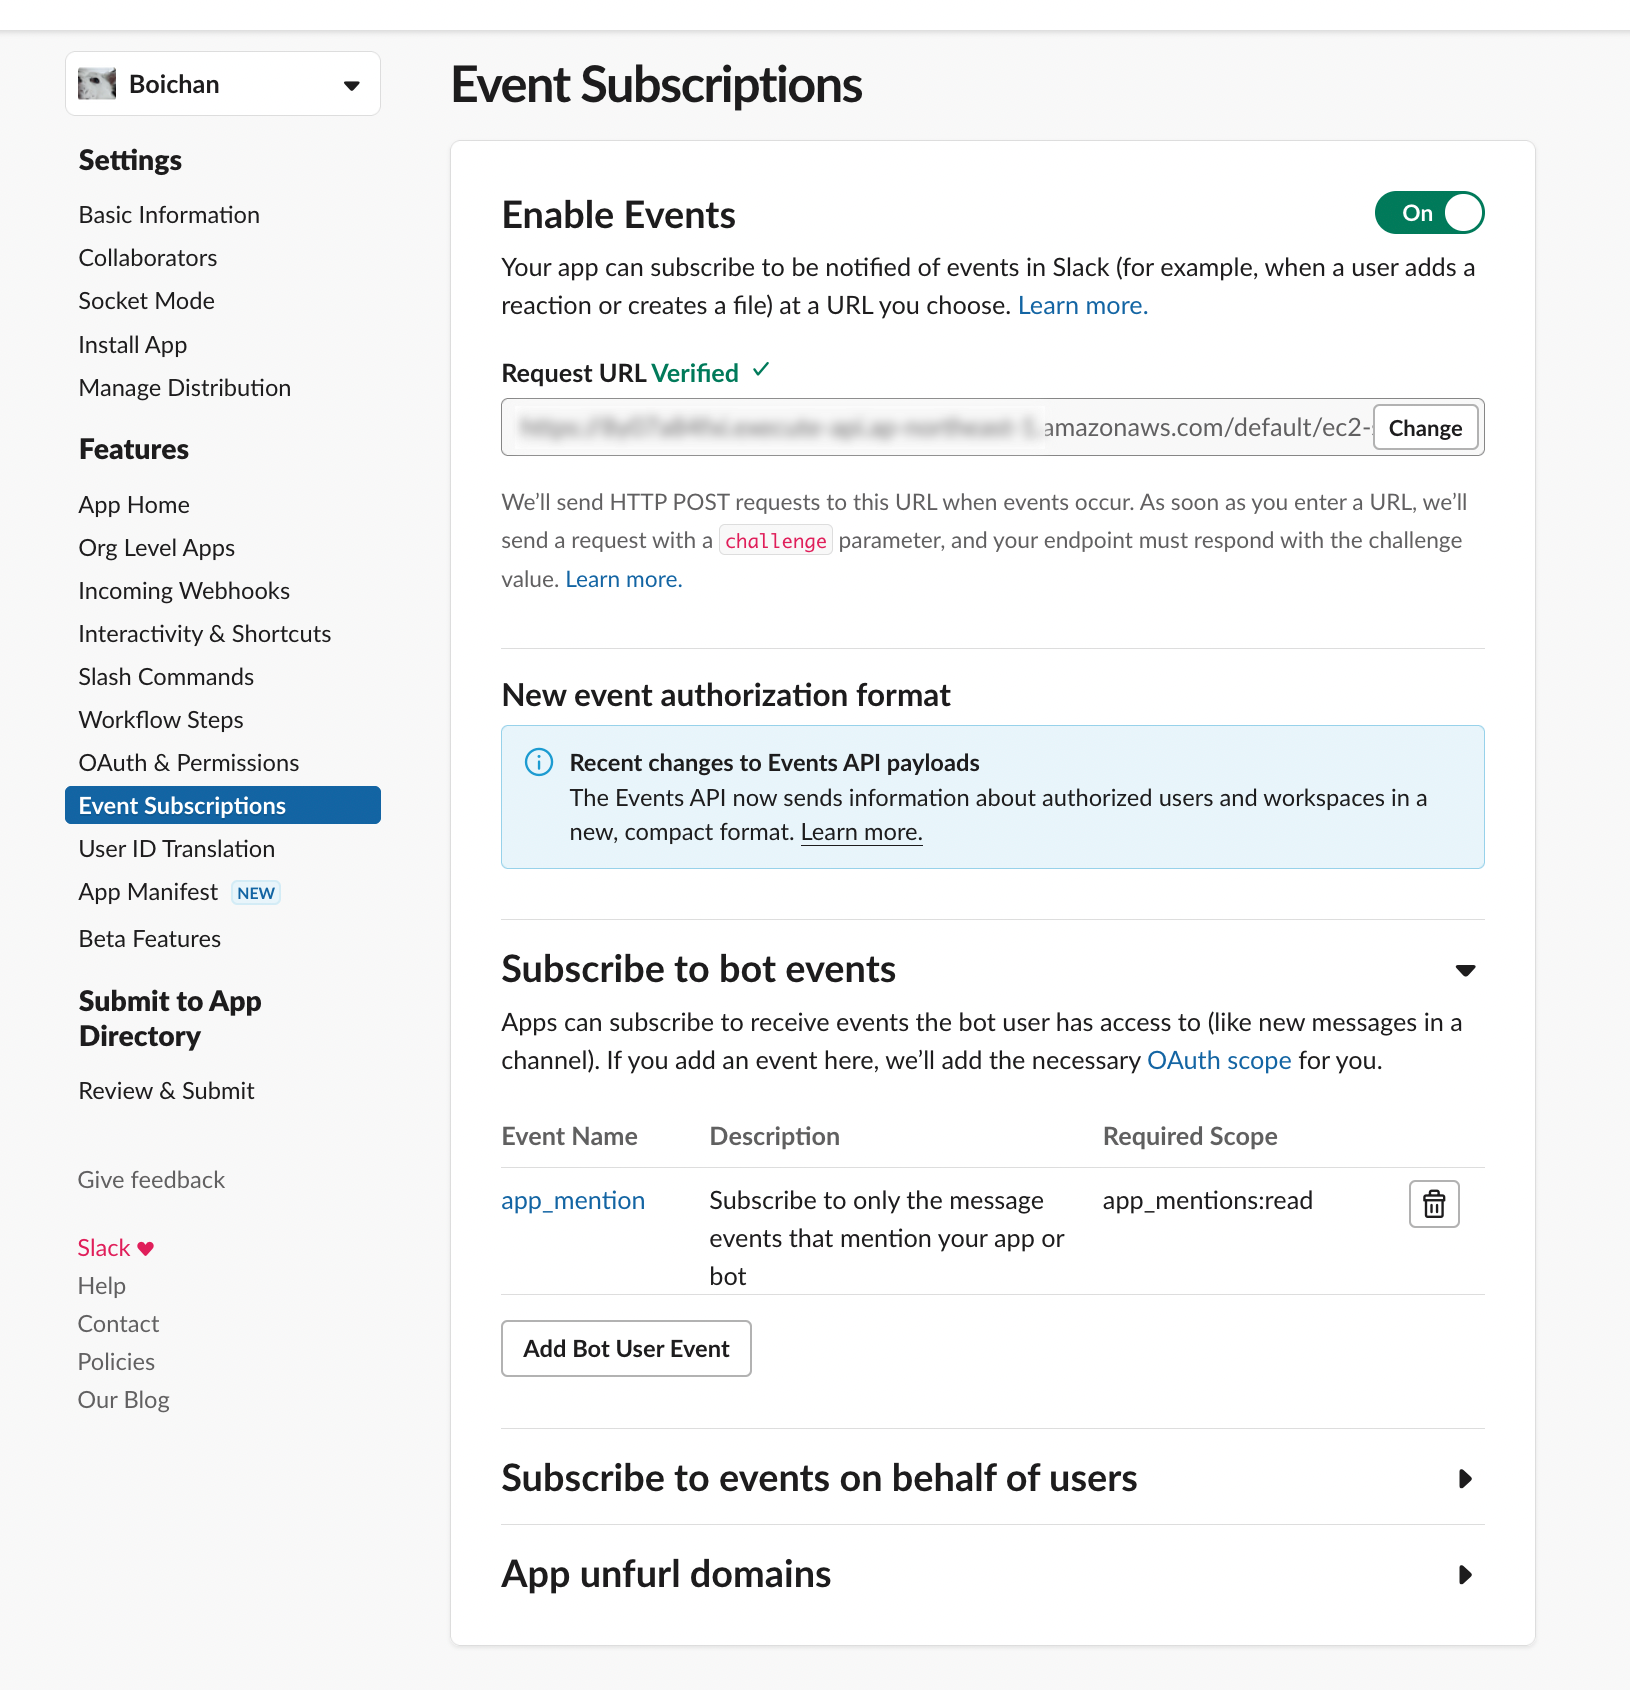
After you create your app, set Event Subscription to Lambda
- Go to Event Subscription by accessing it from the sidebar.
- In Request URL input, enter API Gateway Endpoint that we memo earlier.
- In "Subscribe to bot events" add "message.channels" user event.
- Save changes.
What we set until now is a flow for our chat in slack to be sent to API Gateway as a request. Besides that, we need to develop a flow for our Lambda function to be able to send chats to our channel in slack.
- From the sidebar, go to "OAuth & Permissions".
- In the "Scopes" section, set "Bot Token Scopes" to be the same as below.
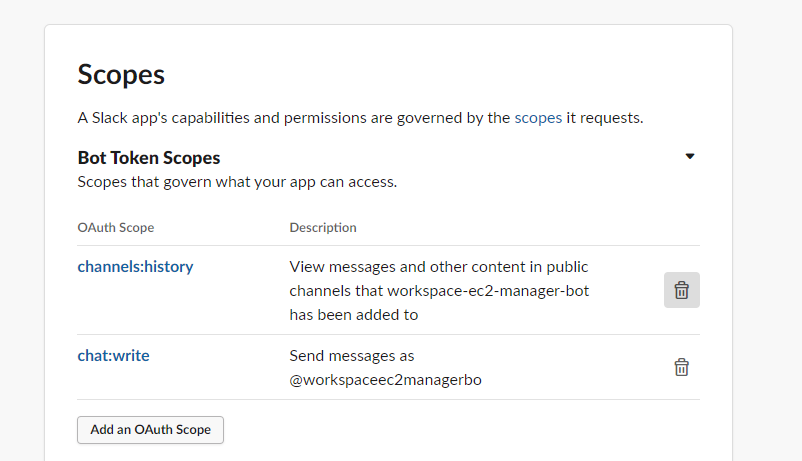
Press install to workspace, and don't forget to memo bot token that begins with xoab-.
Configure Slack Handler to forward Function
Since we finished with our integration setting, we can delete our current code and replace it with the "request forwarding" code.
import json
import boto3

lambda_client = boto3.client('lambda')

def lambda_handler(event, context):
    print(f"Received event:\n{event}\nWith context:\n{context}")

    try:
      lambda_client.invoke(
        FunctionName='ec2-manager',
        InvocationType='Event',
        Payload= json.dumps(event)
      )

    except Exception as e:
      print(e)

    return {
      'statusCode': 200
    }
Setting up EC2 Manager Lambda Function
Halfway there! We just need to create a lambda function two manage our instance, in this case, starting and stopping our EC2 Instance.
First thing first, we need to create and code it.
import boto3
import os
import urllib.request
import json

ec2 = boto3.resource('ec2')
INSTANCE_ID = 'YOUR_INSTANCE_ID_HERE'

def send_text_response(event, response_text):
    channel = event.get("channel")
    ts = event.get("ts")
    print("Messaging Slack...")
    SLACK_URL = "https://slack.com/api/chat.postMessage"

    data = urllib.parse.urlencode(
      (
        ("token", os.environ["BOT_TOKEN"]),
        ("channel", channel),
        ("thread_ts", ts),
        ("text", response_text)
      )
    )
    data = data.encode("ascii")

    request = urllib.request.Request(SLACK_URL, data=data, method="POST")
    request.add_header( "Content-Type", "application/x-www-form-urlencoded" )

    print('Fire off the request!')
    x = urllib.request.urlopen(request).read()
    print(x)

def start_workspace():
    instance = ec2.Instance(INSTANCE_ID)
    if instance.state.get('Name') == 'running':
          return f"Instance Already Running."

    # Start EC2 Instance
    instance.start()

    # Wait Until its Run
    while True:
      instance = ec2.Instance(INSTANCE_ID)
      if instance.state.get('Name') == 'running' and instance.public_ip_address is not None:
        return f"Instance Started Successfully. \n Public IP: {instance.public_ip_address}"

def stop_workspace():
    instance = ec2.Instance(INSTANCE_ID)

    if not instance.state.get('Name') == 'running':
        return f"Instance Already Stopped."

    # Stop EC2 Instance
    instance.stop()

    # Check Until is Stopping
    while True:
      instance = ec2.Instance(INSTANCE_ID)
      if instance.state.get('Name') == 'stopped' or instance.state.get('Name') == 'stopping':
        return f"Instance Stopped Successfully."

def lambda_handler(event, context):
    print(f"Received event:\n{event}\nWith context:\n{context}")
    slack_body = event.get('body')
    print(f"Body:\n{slack_body}")
    slack_event = json.loads(slack_body).get('event')
    user_id = slack_event.get("user")
    text = slack_event.get("text")

    try:
      if text != None and ('Start Instance' in text):
        print("Starting Instance")
        response_text = start_workspace()
        if response_text:
          send_text_response(slack_event, response_text)

      if text != None and ('Stop Instance' in text):
        print("Stopping Instance")
        response_text = stop_workspace()
        if response_text:
          send_text_response(slack_event, response_text)

    except Exception as e:
      print(e)

    return {
      'statusCode': 200
    }
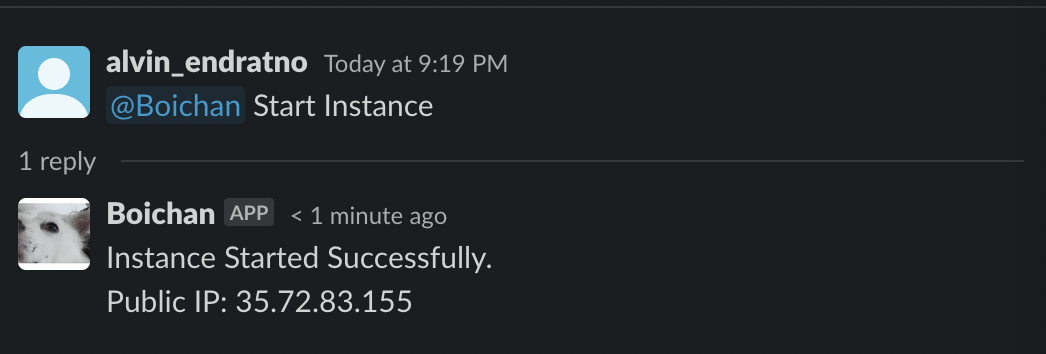
So this is how our code works:
- When there is a "Start Instance" keyword in chat, it will trigger EC2 start and reply public IP when the process is a success
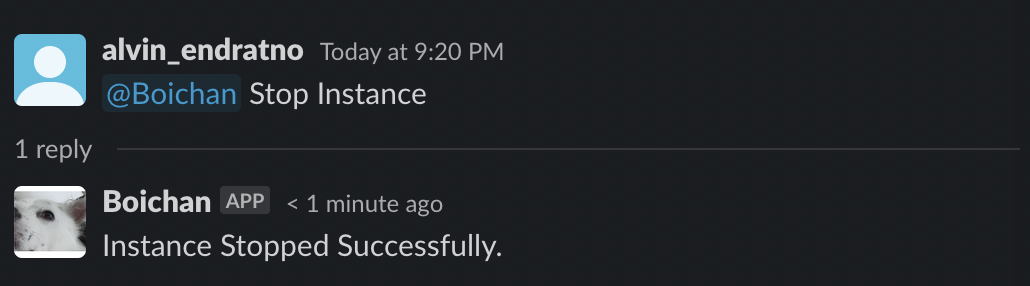
- When there is a "Stop Instance" keyword in chat, it will trigger EC2 start and reply public IP when the process is a success
But, for our lambda to be able to start or stop our instance, we need to permit it to do so.
- Go to the
Configuretab and click Role name
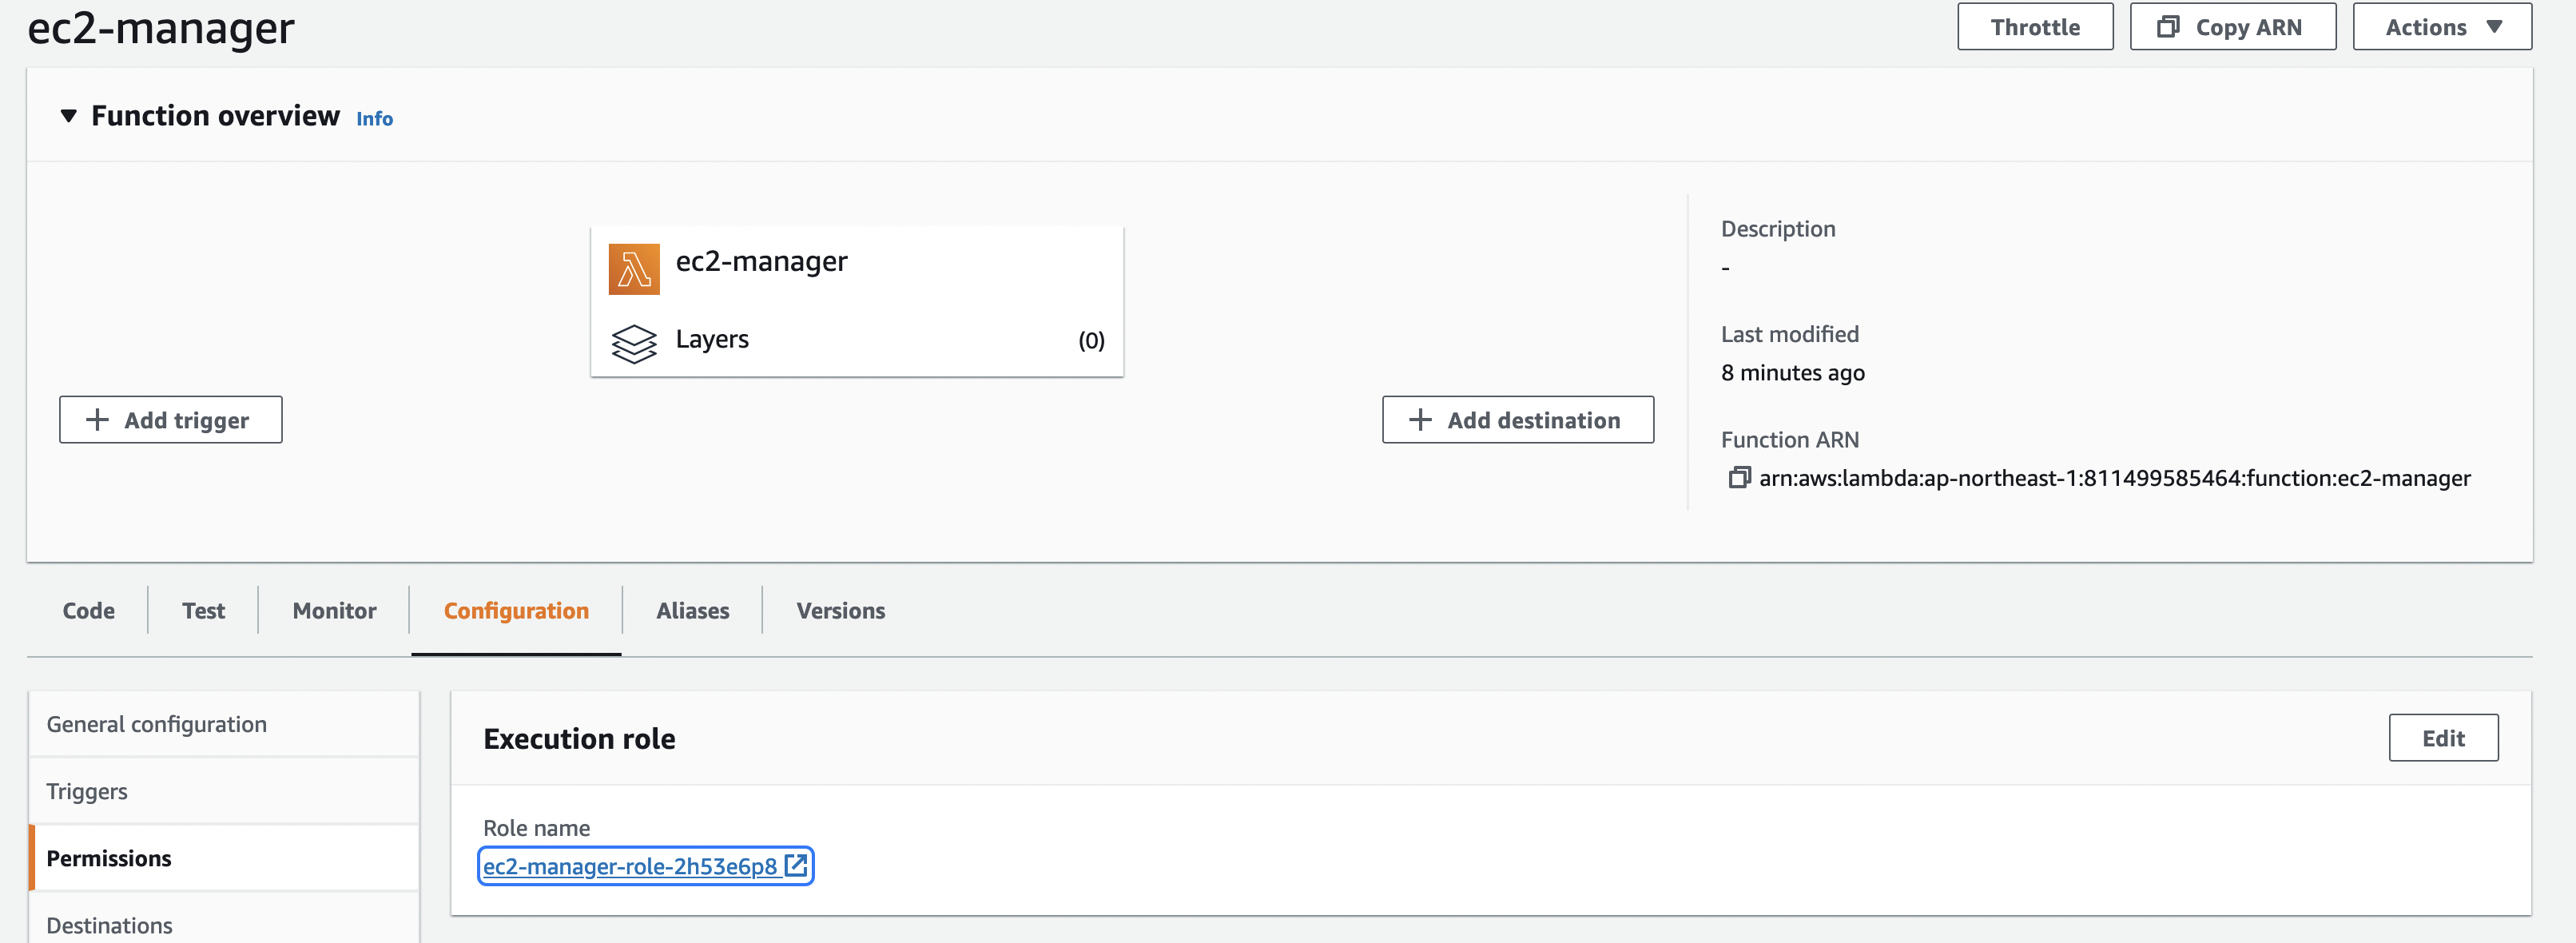
- Add a needed policy to start and stop the instance. if you don't care about security and stuff, attach the EC2FullAccess Policy
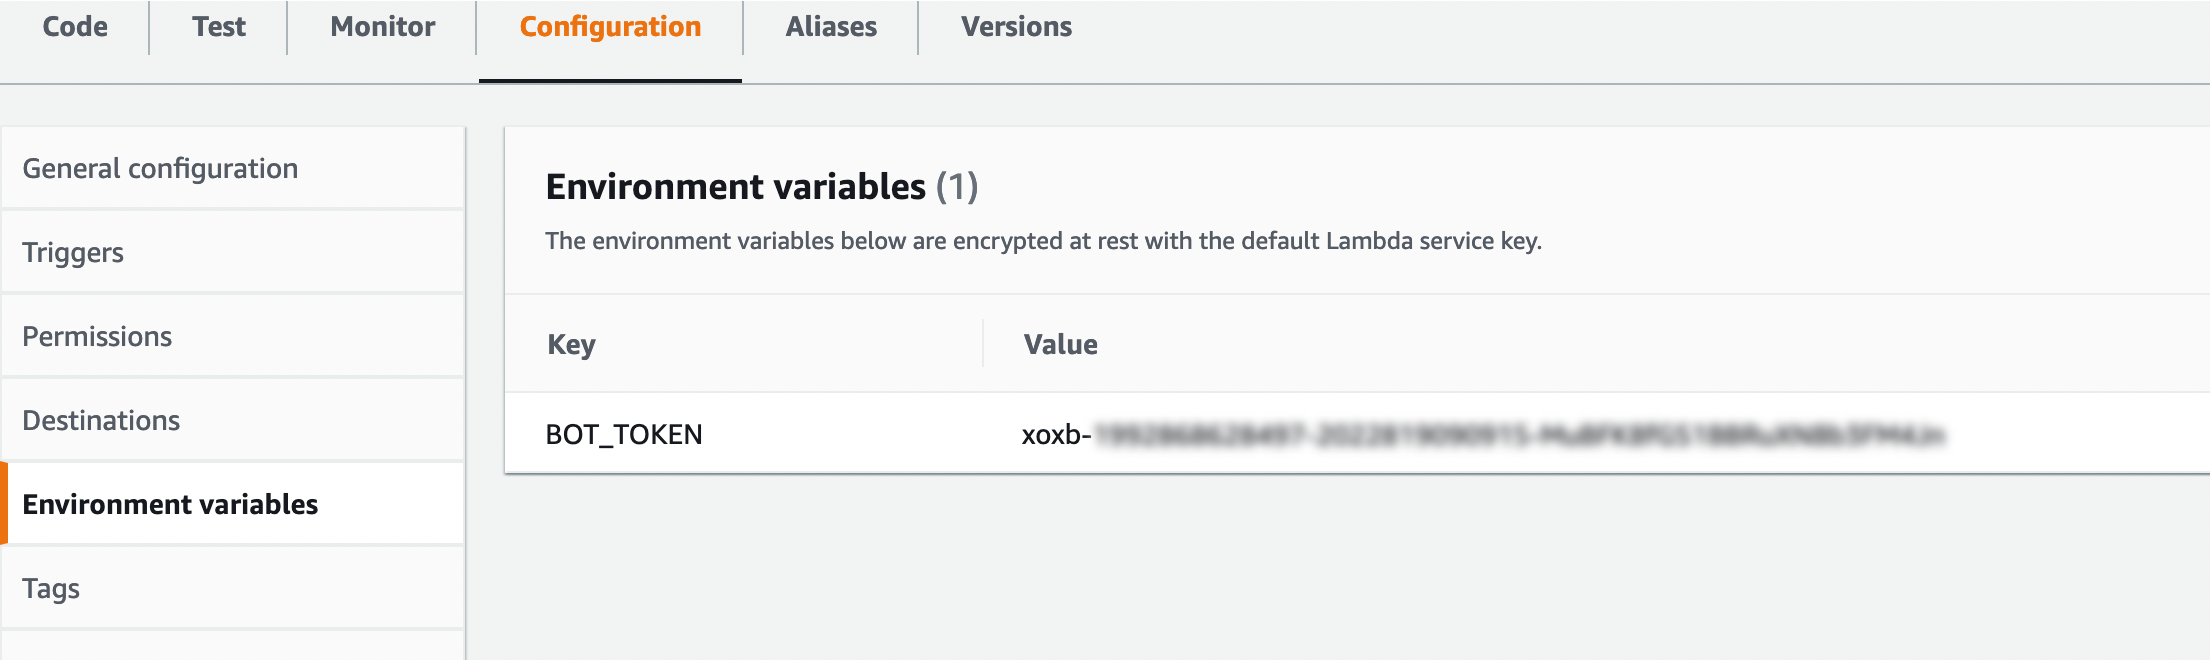
And for our lambda to be able to send messages through Slack API, we need an access token, which is given through the environment variable.
- Go to the
Configuretab and click Role name - Add
BOT_TOKENwith the value of Slack Bot Token that we memo earlier
Testing
If we set everything upright, we should have our bot happy and running.
Starting up Instance:
Stopping Instance:
Closing
It was a long journey. We went through AWS, Slack, AWS, and back to Slack to trigger AWS. Although we built an EC2 instance manager this time, there are many ways to use this flow. Like they always say, the sky is the limit, Happy Hacking!